CLICK HERE FOR FREE BLOGGER TEMPLATES, LINK BUTTONS AND MORE! »

Wednesday, August 31, 2011

I'm Nuts About You

For this week's Blog Candy, please check out the post HERE.

Today I have a cute card to share and I want to dedicate it to all of my wonderful followers. It makes my day when I read your sweet comments about my craft projects. Thanks! I'm nuts about all of you. :-)

This card is made from a file by the incredibly talented Shelly of Shelly's Art (you can find it here). The background paper is from KI Memories. I used the Country Foliage embossing folder on the tree leaves and inked over the lighter green paper with a dark green inkpad. Using a black marker, I added noses and some claws to the squirrels. Then I used my white and blue gel pens for the eyes. It turned out pretty cute, don't you think?


Thanks for stopping by!

Tuesday, August 30, 2011

Butterfly Blog Award


Brenda over at Creativity is only a State of Mind has gifted me with a fabulous blog award. Thank you for thinking of me, Brenda! Please stop over at Brenda's blog. You will not be disappointed. She always has incredibly gorgeous projects. And I am happy to report that she has recently joined me on the Creative Team for FileKutz by LisaJane. Welcome, Brenda! You are a fabulous addition to the team.
In accepting this award I must answer the following 12 questions, and pass the award on to 10 others:

Name your favorite color? Blue
Name your favorite song? anything by Stevie Nicks
Name your favorite dessert? Brownies
What wizzes you off at the moment? People who throw trash on the ground. Some days I hate living on a busy street.
Your favorite pet? My cat Odin. He is the smartest, sweetest cat I have ever owned.
Black or white? Black
Your biggest fear? Not being a good enough mother
Best feature? My eyes
Everyday attitude? Happy and outgoing
What is perfection? The sound of my son's laughter
Guilty pleasure? Adding to my scrap stash (shh, don't tell my husband)
When you're upset, you? Have a good cry or call my Mom to talk

It is always so hard to pick people to pass awards on to. There is so much talent out in blog land. Today I am passing this award on to:

Chloe @ Chloe and Her Clip-On Koalas
Julie @ A Little Bit of Bling
Kacee @ You Had Me at Scrap
Karen @ Crafted With Love by Karen
Kristan @ Baby Cakes
Lisa @ A Mermaid's Crafts
Pam @ Crafty Cards 4 U 2
Shelly @ Shelly's Art
Shen @ My Curious Crafts
Sue @ What's Up With Sue

Please try to stop by and visit these talented ladies. You will find an incredible amount of inspiration and craftiness.


Thanks for stopping by!

Monday, August 29, 2011

A Card for My Sister

For this week's BLOG CANDY, check out the post HERE.

Today I am sharing a card I made for my sister. The card is based on a sketch by Shelly at Paperthreads (for the August Card Sketch Challenge). The background paper is from K & Company's Classic K Margo line. The butterfly is from Shelly's 3D Butterflies file. I used brown Embossing Puffs (Ranger) on the body. I love how it makes it look fuzzy! I added some pen stitching around the butterfly's wings. The sentiment is from K Andrew's Positive Thoughts set. This is exactly what I wanted to say to my sister. I added a couple of butterfly brads from Creative Charms to finish it off. I am quite pleased with how it came out and can't wait to get it in the mail.


This week over at Getting Cricky, the Simply Sunday Challenge is focusing on Winged Things. So I am entering this card into that challenge as well.

I am also entering this card into the Made It Myself Mondays challenge at You Had Me at Craft.


Don't forget there are still a few days left to enter for a chance to win this week's blog candy. I will be announcing the big prize package either next week or the following week.

Thanks for stopping by!

Thursday, August 25, 2011

Anniversary Card & More Blog Candy

Today is my parent's 39th wedding anniversary and I would like to share the card I made for them. I used my new i-rock tool for the first time and, I have to say, it is awesome! Of course, being me, I couldn't just attach a few gems to test it out. I jumped right in with both feet and attached almost 100 rhinestones, using one of the stencils that came in my kit and some pink, clear and black gems. Isn't the flourish pretty? The background paper on the card is from DCWV's Old World Stack. The sentiment is cut from a file by I Scrap Designs.


I also want to announce this week's blog candy. As I mentioned last week, next month is my 1-year blogging anniversary. To celebrate, I will be giving away a bunch of blog candy (I will post details next month). But in order to get in the giving spirit, I thought I would start out by having some small weekly blog candy leading up to the big giveaway. Here is what you could win this week. There is a Simply School Scrap Pad from Provo Craft, green gel candy stickers from KI Memories and some cute embellishments from Creative Charms.


The Rules:
1. You must be a follower.
2. You must leave a comment on this post answering this question: Other than your cutter (KNK, Cricut, whatever), what is your favorite crafting tool?
3. For extra chances to win, comment on my other posts for the week of 8/25 - 8/31. You will get an extra entry for each post on which you comment.

I will draw a winner next week (probably on Thursday, September 1st) and mail out your goodies (due to the cost of postage, this is only open to US residents, but I sincerely appreciate comments from my international readers as well). Be sure to check back to see if you win and also to see what next week's blog candy will be.


Thanks for stopping by!

Blogger Woes, Some Cards & A Winner

I tried to post this yesterday, but Blogger was being uncooperative. I was typing along, nearing the end of my post, when everything (all the text and photos) just vanished. I figured I would just go back to the Posting page and click Edit post and pick up from my last save point. But, no, Blogger had decided to be "helpful" and autosaved just after everything disappeared. So my entire post was gone. Bad Blogger! :( Now sometimes the autosave feature is a great thing. Yesterday morning I was using Shutterfly to create a photo book. I had been working along for about 20 minutes when my cat decided to come step on the power button of the surge strip. Off went the computer and my indoor cat almost became an outdoor cat. Luckily for me (and my cat), Shutterfly had autosaved somewhere along the way and I didn't lose all of my hard work. So I guess we have to take the good with the bad when it comes to these technological advances, huh? Anyway, I will try to recreate the post as best as I'm able. Heck, maybe it will even be better than the first time. LOL :-)

I wanted to send cards to a few relatives with a quick note and some recent photos of my son. I delved into my stash to see what I could find. Lo and behold, there were several candidates that just needed a few finishing touches. Sometimes my cards remain incomplete because I don't want to put on a sentiment before I know what I will use the card for. This card is just such an example. I shared this back on June 13th in my post about stitching on cards. I was quite happy with the card, but unsure what occasion I would use it for. Now I had the occasion and could add my sentiment. I stamped the sentiment on a clear Heidi Swapp frame I found in my stash. The sentiment is from K Andrew Designs' Splashtastic Summer (Stopping by to say) and Food for Thought (have a great day) sets. I love how you can mix and match these stamps, even between sets. And I was able to curve the stamp so it fit my frame. Awesome! I finished the card off with a few dark pink pearls.


Here is another card that sat unfinished, just waiting for the right occasion. The heart and the little chick are both from Shirley Clark. I used the Elegant Vines embossing folder on the large heart and Swiss Dots on the small heart. Using another Heidi Swapp frame, I stamped a sentiment from the Positive Thoughts stamp set and added some pink rhinestones.


Sometimes a card remains unfinished because I am unhappy with it and unsure how to fix it. That is what happened with this one. It is another card which I shared in the June 13th post. I combined stitching using a Bazzill template and using my (then new) Sew Easy. It just seemed very plain and I wasn't sure what to do with it. So after dragging it out of my stash, I added some silver peel-off stickers, a few rhinestones, and a K Andrew sentiment from the Splashtastic Summer set. I am still not thrilled with the card, but it is what it is.


And now onto the winner of last week's blog candy. According to Mr. Random.org the winner is . . . LISA!!! Congratulations, Lisa! Send me an email with your mailing address and I will get your prize right out to you.

Be sure to stop back tomorrow when I post this week's blog candy. I will also be sharing an anniversary card I made for my parents.


Thanks for stopping by!

Thursday, August 18, 2011

Birthday Card and Blog Candy


Today I have a birthday card to share with you. This one is going in my stash for now as I don't have any birthdays coming up for awhile. There were a couple of challenges going on that I wanted to participate in, so that is the reason for today's card. Over on the VDBC forum (in this month's Bingo game), there is a challenge to create a project using a file off the provided Bingo list. I chose to use one of the frames from Chris' Simple Borders file (CD00219). I also used her file for the birthday sentiment (CD00855). Birthday Sundaes has a great challenge this week to incorporate at least 3 brads on your birthday card. This is a great challenge for me because I have tons of brads and always forget to use them. So this card features 4 brads - the flower center, the dot of the "i" and the 2 square floral brads in the lower right corner. I also used a sentiment stamp from K Andrew's Positive Thoughts set.


Now onto the blog candy. Next month will be my 1 year anniversary of blogging. Hard to believe, right? I plan on celebrating that occasion with a big blog candy giveaway, but in the meantime I thought I would have some small weekly blog candy. So here is what I have for you this week.


The Rules:
1. You must be a follower.
2. You must leave a comment on this post. I would love it if you would tell me your favorite adhesive for gluing small pieces to your card or project.
3. For extra chances to win, comment on my other posts from this week (8/14 - 8/21).

I will draw a winner next week (probably on Wednesday, August 24th) and mail out your goodies (due to the cost of postage, this is only open to US residents, but I sincerely appreciate comments from my international readers as well). Be sure to check back to see if you win and also to see what next week's blog candy will be.


Thanks for stopping by!

Link Up Love Party with K Andrew

Guess what time it is? That's right - it's time to Link Up the Love! This is a fabulous way to find new blog inspiration and get to know new people who love to craft. This link up party is brought to you by K Andrew over at www.gettingcricky.com. If you have never been to Kristal's blog, you really need to check it out. Her posts are always filled with heartfelt, inspiring words. And, of course, great craft projects by her and her incredible Design Team!

For the Link Up Party, we are supposed to post our favorite project. My favorite project since the last Link Up party is this card I created. You can see all the details in my post HERE.


We are also supposed to mention one thing we are grateful for. I am grateful for my good health - I just had my wisdom tooth out last Friday and I am now back to feeling normal. Well, health-wise anyway. I am far from normal. :-)

Hopefully you can join in the Link Up Love Party as well. Make sure you stop by Kristal's blog (www.gettingcricky.com).

Thanks for stopping by!


Tuesday, August 16, 2011

Sailboat Treat Box

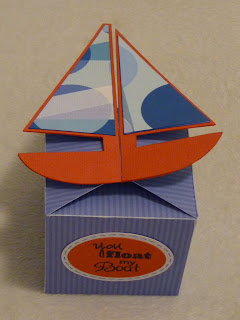
This week's Simply Sunday challenge at Getting Cricky is to create a treat container or party favor. So today I want to share a little treat box I made -- it is a sailboat box. The design is from a file by Michelle over at Paperthreads (she also has a few more boxes: a gingerbread man, a pig, a teddy bear and a train). I cut the box from double-sided paper by KI Memories. Then I cut the boat out of red cardstock from my stash. I cut an extra set of sails (just a little smaller so there was still a red outline) using the opposite side of the double-sided paper. To jazz up the box a little, I added some fun sentiments from K Andrew's Splashtastic Summer stamp set. These were stamped on the same red cardstock as the boat and then I added a layer of white cardstock underneath. I cut the ovals and the circles using my CM Circle and Oval Templates. A little pen stitching finished it off.


Here are a couple of close-ups of the sentiments I used. Aren't they fabulous? I love Kristal's stamp sets!


Challenges:
Simply Sunday Challenge at Getting Cricky
Show and Tell Challenge at Crafting Misfit
Anything but a Card Challenge at Scrapalicious
Challenge #21 (Gift Bags & Boxes) at My Craft Spot


Thanks for stopping by!

Monday, August 15, 2011

Baseball Birthday Card

As promised, here is the birthday card I made for my other nephew. Ian's favorite colors are green and orange and he likes baseball. So I used this super cute Baseball Tear Bear file from Filekutz by LisaJane. There is some pen detail added to the baseball, the bear's face and his clothes. Green Stickles were added to the star on the uniform. At the top of the card, I added a pennant border with Ian's name, which I made from a birthday hat in LisaJane's Birthday Page Kit 1 file. I just turned the hats upside down and removed a few of the decorations. Instant pennant flags. More green Stickles were added to the letters and the tops of the pennants. And what is a birthday without a treat, right? So I added a cupcake for the birthday bear (I mean boy . . . LOL). The cupcake is also from a FileKutz file (Birthday Mesh). Lots of Stickles (red, orange, and icicle) were added to the cupcake as well. I like a lot of sparkle but I didn't want to add too much bling since this is for a 6-year-old boy. :-) I am very happy with the end result. What do you think?


Just to let you know, I will be announcing some BLOG CANDY later this week so be sure to check back in.


I am also entering this card into the Made It Myself Mondays challenge at You Had Me at Craft.


Thanks for stopping by!

Sunday, August 14, 2011

Birthday Card for My Nephew

Hi, everyone! I have a birthday card to share with you today. Last week my twin nephews celebrated their 6th birthday. Today I am sharing one of the cards I made (I will share the other one tomorrow). I asked my Sister-in-Law to tell me the boys' favorite colors and hobbies so I could personalize the cards to suit each of them. Conor's favorite colors are blue and black and he enjoys karate, so this is what I came up with for him.


The background paper is from my stash. I added some dots with my white gel pen to a few of the circles. The cute little karate boy is from Lisa at Quilling Patch - she has a bunch of free paper doll templates. I used a Peachy Keen face stamp from the Everyday Character set. The piece of cake and the balloons are from Shelly's Art (Infinity Card: Birthday). I used Stickles on the letters of Conor's name to add just a little sparkle. The balloons are adhered with pop dots and I used embroidery floss for the balloon strings. I think it turned out pretty cute. What do you think?

Thanks for stopping by!

Thursday, August 11, 2011

Positive Thoughts ATC Cards


My husband has been having a rough time lately and I wanted to make him a card to lift his spirits. I received a fabulous stamp set in the mail on Monday (which I won from Erika at Crafty Sprouts - Thanks, Erika!). It is the Positive Thoughts set from K Andrew. There are so many incredible sentiments in this set that I was having a hard time deciding which one to use on my card. I also wanted my husband to be able to carry these positive thoughts with him (and a standard card is not very convenient to carry around) so I decided to make some ATC-sized cards. These are the perfect size for him to carry in his wallet, or even his pocket. Then he can pull one out when he needs a little lift.


I cut out some ATC blanks from a light brown cardstock. Then I covered each of them with paper from my scrap bin. I used my CM Oval Template for some of the sentiments and the others I just cut by hand. Then I added some pen stitching around the sentiments. The cards still felt a little plain, but I didn't want to go overboard with the embellishments for 2 reasons. #1 - these are for my husband, a man, who doesn't appreciate a lot of frills and bling. #2 - the reason for these cards is the sentiment and I wanted to keep those the focus. So to add just a little something, I pulled out my Stickles and added some subtle bling. :-)

Here are some close-up shots so you can see the sentiments better.


I am really happy with how they turned out. And my husband can write notes on the back, or I can write him some messages. He was pleased with them and even said he would enjoy handing them out to people who looked like they could use some cheering up (my husband is such a good man). When he said that, it reminded me of Kristal's post about being aware of those who could use a kind word and her use of Post-It notes to give uplifting messages to people. I can't seem to find the post right now, but if you are a loyal follower of Kristal's, you will probably remember the post anyway. :) Also, this week's Simply Sunday challenge over at Getting Cricky is all about Positive Thoughts. So I am entering these cards into Kristal's challenge.

Thanks for stopping by!

Thursday, August 4, 2011

Sweet Cupcake Shaker Card

Remember how I said I had another cupcake card to share with you? Well, here it is. :) I had so much fun going through my scraps to make the card for the Scrapalicious sketch challenge (you can see that card HERE if you missed it), that I thought I would make another card using my scraps. Plus, Becky over at Squirly Girl Creations is having a challenge right now to create a card using your scraps and a K Andrew Art Stamp. I really enjoyed the sketch that was provided for the sketch challenge, so I went over to Page Maps by Becky Fleck to find another sketch for inspiration. This is the sketch I used. It is from the March 2010 Card Maps section.


And here is my card.


For the background paper, I used Ruche textured cardstock in Khaki (Paper Temptress). This has such a great texture. I love all the paper that Patricia carries over there. For the blocks I used two different My Mind's Eye patterned papers. Love the colors on these papers, don't you? The blocks were made from a cutting file by FileKutz called Quilt Block Puzzler. The cut file had the dashed lines already and I just went over them with a black marker. The focal element on the card is a cupcake shaker. Erika over at Crafty Sprouts had a great tutorial on making shakers and is hosting a challenge to make a shaker card. My cupcake is made from a cute cupcake border file by Beloved Keepsakes. I modified it quite a bit to create my cupcake, but that was my starting point. The background of the cupcake was embossed with the Spots & Dots folder and I used green and orange micro beads inside the shaker. I gave my cupcake a cute face using a Peachy Keen face stamp (Wide Eyed Kids) and added some red Stickles to the cherry. Finally I stamped my sentiment using a K Andrew Art Stamp (Food for Thought).


Here are the challenges I am linking this card up to:

Shaker Card Challenge at Crafty Sprouts
Use Scraps and a K Andrew Stamp Challenge at Squirly Girl Creations
Made It Myself Mondays at You Had Me at Craft


Thanks for stopping by!
Tuesday, August 2, 2011

Another Cupcake Card

I am back again in the same day. Can you believe it? I have been trying to work in more crafty time, and this week seems to be going well so far. For today, I have a sweet cupcake card to share with you. It seems like I have been making a lot of cupcake cards lately, huh? Stay tuned because there will be yet another one in the next few days. :)

For this card, I used plain blue cardstock for the background. I did stipple on a couple shades of blue ink (French Blue & Faded Jeans) for added depth. The cupcake mesh is from My Scrap Chick. I cut the base from a yellow polka dot patterned paper. Then I cut the icing from white cardstock. Each of the cupcake's icing layer was embossed and then I went over the raised images with various ink pads. Then to give the cupcakes a little glitz, I added Stickles to several of them. I also added a brad to mimic a cherry to the top of one of the cupcakes. A colorful ribbon from American Crafts is along the bottom of the card and the Make a Wish sentiment is made from some EK Success vellum stickers. The final touch was some white pen stitching around the outside of the card. I think it turned out pretty cute.


I am entering this into the Birthday Sundaes Blog Hop Challenge.


Thanks for stopping by!

Scrapalicious Challenge #13

I recently came across the site Scrapalicious USA. What a great site this is! This week's challenge was to create a card using this sketch.


So I dug into my scraps and found a bunch of K & Company paper leftovers from recent projects. This card was so quick and easy. I cut a few strips of paper with my paper trimmer, inked around the edges, stamped a sentiment, punched it out, adhered it with pop dots and added a few pearls. Done! :) This was so simple and yet I love how it turned out. And I managed to use up some of my scraps. Woohoo!


If you have never checked out the Scrapalicious site, head on over and take a look.

Thanks for stopping by!


Monday, August 1, 2011

Monogram Tile

Just a quick post today. I wanted to share this tile I made using a fabulous file from Visual Designs by Chris. She has the entire alphabet included in the file. The tile I used is a 6x6 ceramic tile. I wanted to use a larger tile (like maybe 8x8) but I live in a small city and my choices were limited. Luckily we have a Lowe's opening this month so I won't have to drive 30 minutes to shop the home improvement store.


Wouldn't this make a great gift? I plan on making some for Christmas gifts this year. It is so simple to make, and yet it looks so elegant. All you need is a ceramic tile, some vinyl, and the cutter file. Easy peasy. :-)

Thanks for stopping by!